
Many of us reading this article may be either too young or simply unaware of the fact that, for over 40 years, the industry standard for processing film to professional quality standards was Gaseous Burst Agitation. As a result, I want to reintroduce this film development procedure to large format photographers, in the hope that it will interest, enlighten, and possibly stimulate you to experience its possibilities in your photographic work.
What, then, is Gaseous Burst Agitation, and how does it work?
Gaseous Burst Agitation is a time-tested procedure to develop film in tanks with nitrogen gas. It is simple, cost effective, accommodates a wide range of developers (including Pyro), and utilizes a wide array of new and used products. It has also proved successful when using conventional Kodak stainless steel sheet film hangers, as long as one adheres to a set of strict process criteria.
Invstigating this subject, I learned that Gaseous Burst Agitation entails introducing short bursts of inert nitrogen gas into the bottom of a film developing tank through a plenum. There are two basic plenum configurations. The first is a curved plastic or metal tube with small holes in it. The second is an enclosed space at the bottom of a processing tank with small symmetrically spaced holes on the top surface. Through these plenum holes, nitrogen gas, being lighter than the liquid developer, races to the surface and displaces the film developer, resulting in a rise of the entire solution within the tank. Sheet film hangers remain static through the entire development period.
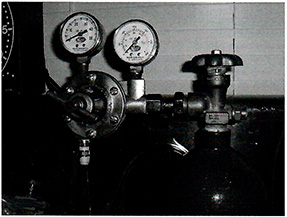
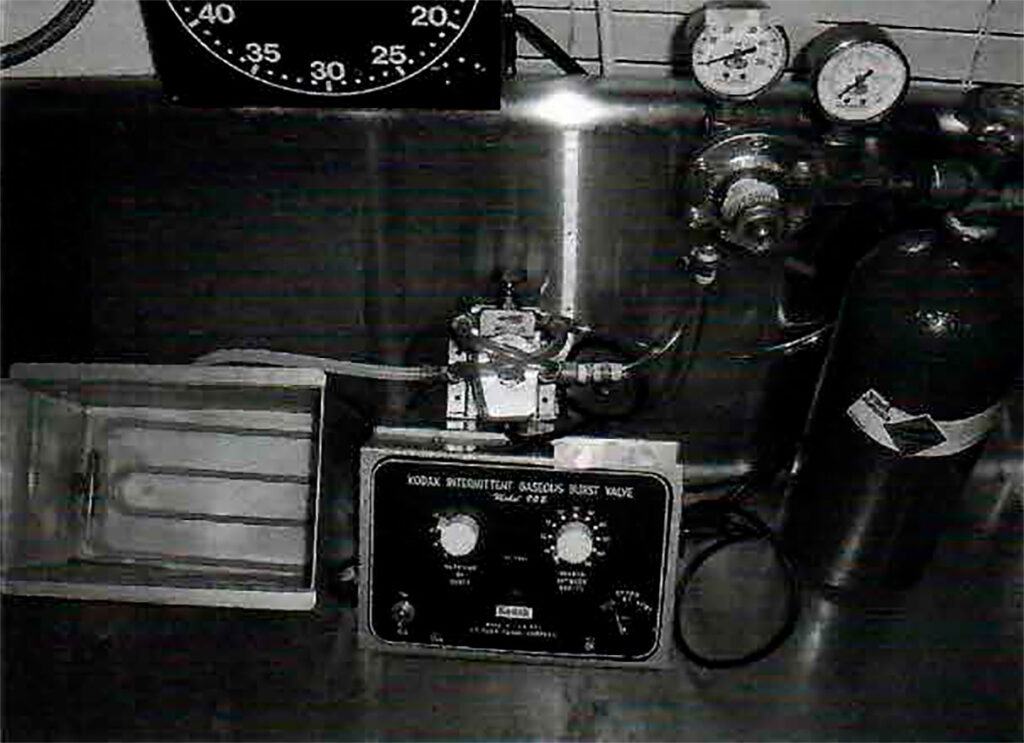
The nitrogen gas is safely contained in a special pressurized tank at about 2,000 PSI, and a nitrogen pressure regulator is used to drop the pressure at the plenum to about 10-15 PSI. With the use of an electronic interval timer, one can select the appropriate gas burst duration and the elapsed time between bursts. The bursts themselves are accomplished with the use of a gas solenoid valve. Small-diameter clear plastic hose takes the low-pressure gas from the nitrogen pressure regulator (screwed into the top of the nitrogen bottle) to the solenoid valve, and from the downstream side of the solenoid valve directly to the plenum at the bottom of the developing tank.
Earlier discussion of this processing technique indicated that I would need custom tanks with plenums built in. In addition, special sheet film hangers would be necessary, because Kodak 4A sheet film hangers produced unacceptable development “surge” patterns along the edges of the film, which was even more of a concern when using Pyro developers.
After several trips to speak with local acrylic fabricators in Denver, I was completely discouraged by the excessive costs of having custom hangers and tanks built, not really knowing if these expenses would bear fruit. I came to the conclusion that I was not going to proceed with testing this process unless it could be accomplished at costs I felt were reasonable.
Some time later, at the end of a print review session with Richard Boulware, a retired professional photographer here in Denver, the discussion shifted from the esthetics of the photographs being reviewed to the technique that I was using to produce them. He asked me if I had even considered using Gaseous Burst Agitation, as he had used this technique with great satisfaction in his former photographic studio. I explained to him that I had been intrigued by the potential of the procedure, but was stymied by my inability to economically produce an acrylic tank with a plenum and specialized hangers. Richard politely asked why I was making it harder than necessary? He said that, as long as you understand the process, Gaseous Burst Agitation is neither difficult nor complicated, and is likely a candidate for being the best procedure possible for the development of sheet and roll film.
Richard provided me with the Kodak publication E-5 7 “Gaseous Burst Agitation In Processing” and encouraged me to read the article in detail, and follow the instructions to the letter. He then loaned me a 3.5-gallon stainless steel processing tank with plenum, a solenoid valve, and an interval timer to perform the tests. I acquired some nitrogen, and after a quick trip to the hardware store for a half-dozen hose clamps and some clear plastic hose, I was ready to start testing. Since the Kodak publication made reference to using standard Kodak 4A stainless steel sheet film hangers, I decided to use them for my initial tests.
Following the Kodak publication’s instructions for onesecond bursts in concert with six bursts per minute for B&W film, I tested 4×5, Sx7, and 8×10 sheet film in the steel hangers, in Rodinal 1:50 and Ilford DDX, with perfect results and absolutely no development surge marks or other adverse development effects. To make sure that there were no development imperfections that I could not see on the negative, I contact-printed each negative and the prints looked fine. My next test involved sheet film development in Pyrocat 2:2:100 in the same tanks and hangers, and again I was pleased that I obtained evenly developed negatives. To make sure that it was not the size of the tank that was the dependent variable, I located a one-gallon gas burst tank and processed a number of 4×5 negatives with both Rodinal 1:50 and Pyrocat 1: 1: 100, and again obtained favorable results. As a result of my testing, I am convinced that Gaseous Burst Agitation is a development procedure that needs to be shared with large format photographers, who were either unaware of its capabilities or felt that it was only attainable with expensive custom-made tanks and hangers, using any developer of their choice.
There are several critical operating requirements detailed in the Kodak publication that must be followed explicitly to attain satisfactory results with this process. These are as follows:
-The fluid level during each nitrogen burst must rise 5/ 8″.
-For B&W film, the burst duration must be 1 second, and there should be 6 bursts per minute. The publication lists other films and the recommendations change accordingly.
-The developing tank must be leveled fore and aft to ensure that the direction of the nitrogen bubbles racing to the surface is perfectly vertical.
-When using a 3.5-gallon tank, the nitrogen regulator downstream pressure gauge should read about 15 PSI. Smaller tanks will require slightly less pressure to attain the 5/8″ fluid level rise during the nitrogen burst.
-Special precautions should be taken when developing multiple formats in a common tank, to address the issues of uneven turbulence.
Richard shared with me that he did, in fact, have difficulty in “fine tuning” the gas burst system that he used in his studio, simply because there are so many variables in this process when you are flying blind (i.e., without the assistance of the research by Kodak on this subject). It was not until a fellow photographer shared with him the Kodak publication that his Gaseous Burst Agitation process started to perform acceptably. Furthermore, Richard shared a piece of wisdom on this subject that completely changes the way people should look at Gaseous Burst Agitation: Nitrogen bubbles do not agitate the film. It is the 5/8″ rise of the entire volume of developer that provides the agitation (induces fresh developer solution against the yet undeveloped parts of the negative). The bubbles are the after-effect of the lifting of the developer in the agitation process. The agitation is accomplished by the lifting of the entire developer tank solution 5/8″ above the static level. This is what provides the agitation, not the bubbles.
Richard further stated that, in his 30 years of professional photographic experience, 98% of the problems that other users of Gaseous Burst Agitation experienced, which caused them to either abandon the procedure or spend endless time and energy adjusting it, were caused by misunderstanding of this conclusion regarding fluid rise and burst duration, extensively researched and reported by Kodak. The natural reaction of the photographer to developing flow marks on their negatives while learning the Gaseous Burst Agitation process is to turn down the delivery pressure. Unfortunately, the problem will only be solved by the counterintuitive technique of TURNING UP the gas delivery pressure to the plenum, to accomplish the correct 5/8″ fluid rise for the one-second gas burst duration. My point is that both the proper burst duration and the fluid level rise of 5/8″ must occur simultaneously to obtain optimal results. I can say without hesitation that you will likely have a myriad of problems if you deviate from plenum pressure and/or burst duration recommendations made by Kodak.
Comparing Gas Burst Agitation to several of the other methodologies of developing sheet film, there are several unique characteristics of this process that I feel merit consideration. First of all, it has only one moving part, the solenoid valve that opens and closes, allowing nitrogen gas to enter the plenum. Secondly, it does not require any manual handling, as is the case with trays, drums on roller bases, or manual tanks. Once the cage holding the hangers is inserted into the developing tank, processing is a flip of the switch on the interval timer. This translates to a high level of processing consistency. Thirdly, depending upon the tank size, this process can handle a large quantity of sheet film in a single processing run.
For many that have languished over tray processing European sheet films and their propensity for scratches, Gaseous Burst Agitation avoids the potential for all forms of emulsion damage, because the films are in hangers for the entire procedure and never make contact with each other. Development by Inspection (DBI), conducted with the assistance of either an infrared monocle or a 15W safelight bulb and green filter, is easily facilitated by simply pulling a sheet film hanger out of the tank and holding it at the correct inspection angle.
I recently made the acquaintance of Alistair Inglis, who produces top quality archival print and film washers from cast acrylic at his shop in Vancouver, BC. His web site is at http://www.alistairinglis.com/. He has expressed interest in producing various-sized acrylic tanks with plenums in them for use with Gaseous Burst Agitation, which can accept conventional hangers, and possibly custom-made sheet film hangers in various sizes (possibly including ULF sizes as well), as it is a natural extension of his current niche business. We are continuing to test his development tanks and hangers as we speak. I see this niche being filled by Alistair for people who want to take advantage of the process, but want the smallest possible tank for the specific format that they are shooting. Similarly, I have contacted Carr Manufacturing, which produces stainless steel hangers for sheet films that I feel are a bit improved over the conventional Kodak 4A hangers, because they use a set of thin wires to hold the film at the top of the hanger, as opposed to the Kodak 4A hangers. Clearly, since the Kodak 4A hangers work, I simply mention another alternative for those who do not have hangers in stock.
An Arkay stainless steel two-gallon tank with plenum is $190. The hanger cage is $90. Static two-gallon stainless steel tanks are $100 each. As a result, the total costs to outfit a Gaseous Burst processing line with brand new equipment would be approximately $1, 100-$1,200. Used tanks with plenums come in various sizes from about one gallon and up, to accommodate your specific sheet film processing needs up to 8×10. If you purchase a tank either new or used, immediately test it to ensure that the nitrogen burst that elevates the fluid level in the tank does so very uniformly across the entire surface. If the plenum holes are too large, you will see the effects of an inefficient burst that will result in variable rising of the surface fluid in the tanks during a gaseous burst. You should return the tanks to the seller, as this condition is unacceptable for processing sheet film.
It is unfortunate that Gaseous Burst Agitation has fall-en out of favor or the experience has not been successful-ly passed on to the new generation of large format pho- tographers. I feel compelled, as does my friend and men-tor Richard Boulware, to pass on our experiences with this technique, as the more options large format photog-raphers have to develop their film, the better we all are. However, the positive fallout of this fact is that there are many gaseous burst components in the used market, which can be acquired at very reasonable prices.
Summary of Advantages of Utilizing Gas Burst Agitation
-Relatively inexpensive
-Uniform consistent results from one processing run to another
-Superior to trays and manual tanks
-No motors or moving parts that wear out or need maintenance or replacing Easily handles large or small quantities of film to be processed Flexible to allow N-, N and N+ films to be processed simultaneously
As a follow-up to this article, the next discussion of this technology will investigate Gaseous Burst Agitation for ultra large format sheet films, as one of the niches I see is Extreme or Minimal Agitation Development with dilute developers such as Rodinal or Pyrocat. Alistair Inglis has agreed to produce test tanks and custom hangers for 8×20 sheet film development, which will be tested shortly.
The Kodak Publication ES 7 will be made available to the reader at the View Camera web site after proper clearance from Kodak has been secured.
Ed. Note – Although the author used Pyrocat staining developer for his test, PMK and W2D2+ are also very good choices for this system.
*Author’s Note – This article was first published in View Camera Magazine in the May/June 2007 edition.